Case Study: Audio Widget Overlay View by Cleveroad
Updated 06 Jun 2023
6 Min
5088 Views
Well, it is not the 3D touch, of course, but this feature can facilitate your interaction with a smartphone a lot. Asking what is our invention about? Well, the Audio Widget Overlay can help you control the playback in seconds without making a pile of unnecessary steps. Interested in the niceties of the implementation? So stay with us and soon you will be in the loop...
One of the privileges that Android users have over their iOS-using fellows is an opportunity to install widgets. For better or worse, but Apple doesn't want to change it's rules and adopt something new, the platform stays old-line. The term 'widget' is only restricted to the usage of the Control Center and Notification Center while running other apps on the platform. By the way, the former was only introduced on releasing iOS 7 and had been outpaced by the SBSettings tweak for iOS jailbreaking.
If it comes to Android, the situation is completely different here. The rules of the platform are so flexible that a developer is literally free to play his own game without using some 'illegal' approaches. That's why we have numerous stickers, reminders, and other floating widgets over the top of any active full-screen app. Having taken advantage of the situation, we came to a conclusion that it's time we made a contribution to the collection of Android widget outlays. So let us tell you what exactly has inspired us and how the development process was going.
What influenced us
Since we've got a bit obsessed with music lately, we wanted to create something to support our previous brainchild called CRAudioVisualizationView. We assume that this one and it's younger friend, CRAudioWidgetOverlay, nicely complement each other.
Do you fond of qualitative open source projects? Check out another case study related to Audio Visualization View For Android
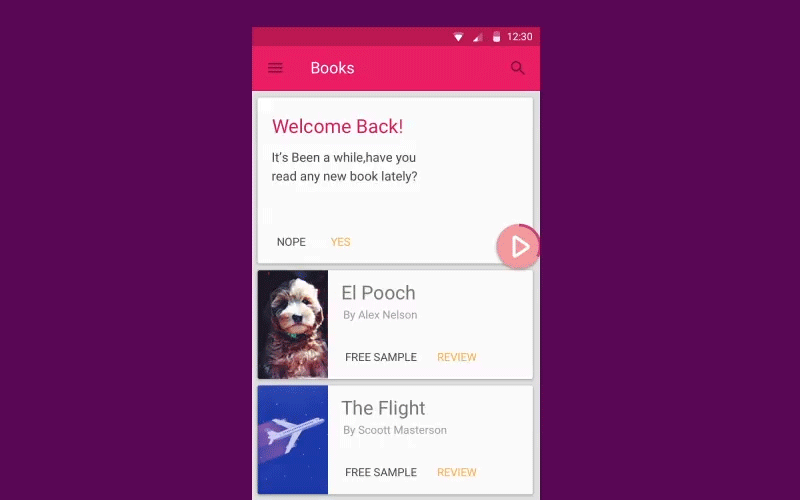
There is no reason to lie, so we want to say in all sincerity that Cleveroad were inspired by Facebook's Chat Heads. Quite a useful thing when it comes to messaging. But who's going to take care of music lovers? All of them want to have a quick and comfortable access to their audio files when being on the go. Moreover, what to do if you want to chat and switch compositions at the same time? Here we've tried to hit two birds with one stone: to develop a library that gives people more control over the playback and to make it look as awesome as possible.
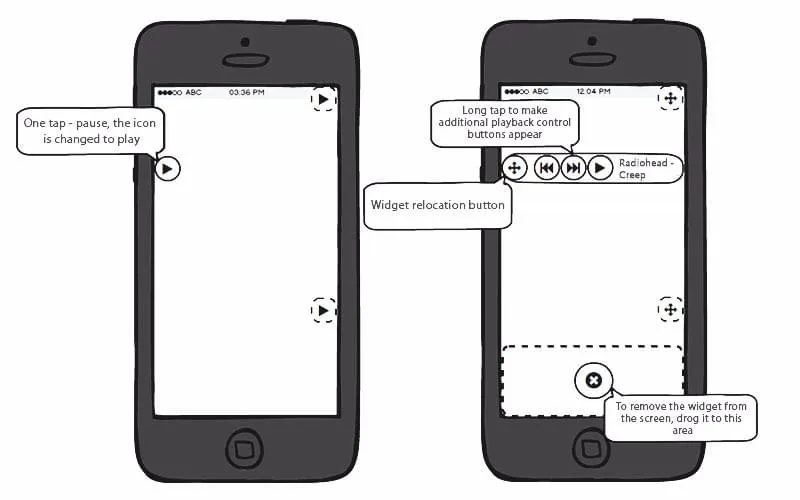
Logic. We thought that everything had to feel natural within Android environment, so the logic of our Widget is carried out in accordance with the platform's by-laws. Standard gestures: double-touch drag to the left/right to make the Widget move, long press to make it maximize, tap on a widget button to perform an action, tap on an empty field to minimize a widget, double-touch drag to the bottom of the screen to make it disappear.
Design. Our gang of talented designers did a great job of developing a design concept for the equalizer. All the effects have been created using the After Effects CC application.
As we've already said, we wanted them both, the Audio Visualization View and Widget Overlay, to be performed in a united style. Since the animation of our equalizer is a game of waves and bubbles, we've decided that it won't hurt if we add some more over another application (perhaps, a slightly boring one). So now, our Widget is full of bright colors and sprinkles the cutest bubbles ever.
Now let's find out what's behind these juicy colors and splashes.
Development process
Step 1. In accordance with our wonderful author, the development process starts with coming to work, but now, in all seriousness To start, you need to add the following dependency to your project in the build.gradle file:
dependencies {
    compile 'com.cleveroad:audiowidget:0.9.0'
}
Step 2. As always, to make sure that no user's data or any other application on a device would be impacted, we need to add two permissions to the app manifest:
<!-- used for drawing widget. This permission must be granted before calling AudioWidget.show(). -->
<uses-permission android:name="android.permission.SYSTEM_ALERT_WINDOW"/>

<!-- used for notifing user that he is about to remove widget when he drags it on remove widget icon. -->
<!-- This permission granted by default on Android 6.0+ devices. -->
<uses-permission android:name="android.permission.VIBRATE"/>
As you can see, the first one will help you draw a widget over other applications. The second one is needed to inform a user that he is about to make a widget disappear when dragging it to the remove icon at the bottom of the screen. Although, the latter is optional.
Step 3. The next is to create a new instance of your future widget by using the Builder:
AudioWidget audioWidget = new AudioWidget.Builder(context)
        .lightColor(...)
        .darkColor(...)
        .expandWidgetColor(...)
        .progressColor(...)
        .progressStrokeWidth(...)
        .crossColor(...)
        .crossOverlappedColor(...)
        .crossStrokeWidth(...)
        .buttonPadding(...)
        .bubblesMinSize(...)
        .bubblesMaxSize(...)
        .shadowColor(...)
        .shadowRadius(...)
        .shadowDx(...)
        .shadowDy(...)
        .playDrawable(...)
        .pauseDrawable(...)
        .playlistDrawable(...)
        .prevTrackDrawale(...)
        .nextTrackDrawable(...)
        .defaultAlbumDrawable(...)
        .edgeOffsetXCollapsed(...)
        .edgeOffsetYCollapsed(...)
        .edgeOffsetXExpanded(...)
        .edgeOffsetYExpanded(...)
        .build();
If you are satisfied with our widget appearance, you are welcome to use the default configurations doing it like this:
AudioWidget audioWidget = new AudioWidget.Builder(context).build();Step 4. If you want to be informed about the events happening at the moment, you can create a Controller (it's optional, so you decide):
// media buttons' click listener audioWidget.controller().onControlsClickListener(new AudioWidget.OnControlsClickListener() {
    @Override
    public boolean onPlaylistClicked() {
        // playlist icon clicked
        // return true to collapse widget, false to stay in expanded state
    }

    @Override
    public void onPreviousClicked() {
        // previous track button clicked
    }

    @Override
    public boolean onPlayPauseClicked() {
        // return true to change playback state of widget and play button click animation (in collapsed state)
        return true;
    }

    @Override
    public void onNextClicked() {
        // next track button clicked
    }

    @Override
    public void onAlbumClicked() {
        // album cover clicked
    }
});

// widget's state listener
audioWidget.controller().onWidgetStateChangedListener(new AudioWidget.OnWidgetStateChangedListener() {
    @Override
    public void onWidgetStateChanged(@NonNull AudioWidget.State state) {
        // widget state changed (COLLAPSED, EXPANDED, REMOVED)
    }

    @Override
    public void onWidgetPositionChanged(int cx, int cy) {
        // widget position change. Save coordinates here to reuse them next time AudioWidget.show(int, int) called.
    }
});
With AudiowidgetController, you can set the track duration, current playback position, album cover, and so on. Using the start(), pause(), and stop() methods, you can set a current state of the user's playback. For more information on how to use the Controller, we'd advise taking a look at theMusicService Class.
Step 5. To make a widget displayed on the screen, you need to call AudioWidget.show(int, int) method. To hide it, use AudioWidget.hide() method.
audioWidget.show(100, 100); // coordinates in pixels on screen from top left corner
...
audioWidget.hide();
Step 6. Besides the SYSTEM_ALERT_WINDOW permission, you need to use ACTION_MANAGE_OVERLAY_PERMISSION in Android 6.0+ to make sure that your application is able to draw over others. This will bring up an activity where your user can choose whether to let an app be on the top or not (blame Android 6.0 Marshmallow for any inconvenience caused :)
To perform this, you need to do the following in the Activity:
...

    // somewhere in your code
    if (Build.VERSION.SDK_INT >= Build.VERSION_CODES.M && !Settings.canDrawOverlays(this)) {
        Intent intent = new Intent(Settings.ACTION_MANAGE_OVERLAY_PERMISSION, Uri.parse("package:" + getPackageName()));
        startActivityForResult(intent, OVERLAY_PERMISSION_REQ_CODE);
    }

    ...

    @Override
    protected void onActivityResult(int requestCode, int resultCode, Intent data) {
        super.onActivityResult(requestCode, resultCode, data);
        if (requestCode == OVERLAY_PERMISSION_REQ_CODE) {
            if (Build.VERSION.SDK_INT >= Build.VERSION_CODES.M && Settings.canDrawOverlays(this)) {
                // now you can show audio widget
            }
        }
    }

    ...
It seems that we've covered all the important points to consider when integrating this widget with your app. For more info on this fantastic library, visit GitHub.
Oh, there is one more thing we are thinking of creating one more library in the nearest future. Since we have an audio widget overlay and a nice 'wavy' equalizer, we feel that something is missing, so what we want to do next time is to create a playlist for our music player... Hope, we won't make you wait long.
Meanwhile, stay tuned and subscribe to our new publications here and on Dribbble. And remember, if there is anything else we can help you with, contact us!

Evgeniy Altynpara is a CTO and member of the Forbes Councils’ community of tech professionals. He is an expert in software development and technological entrepreneurship and has 10+years of experience in digital transformation consulting in Healthcare, FinTech, Supply Chain and Logistics
Give us your impressions about this article
Give us your impressions about this article