The Architecture We Use for Android Apps (With Code Samples)
Updated 17 Mar 2023
14 Min
3467 Views
Developing Android applications of high-complexity requires efforts and experience. Any app should follow the users’ expectations as well as be flexible.
There are several different architectures that can be used by Android developers:
- Stable samples — Java
- Stable samples — Kotlin
- External samples
- Deprecated samples
- Samples in progress
Of course, each of these samples should be used depending on the objectives, approaches, etc. Having explored them, we’ve come up with a more understandable approach and a less layered architecture for our projects. Utilizing this architecture, we’ll show how to develop a basic Android app. It’ll have such features as loading the list of news, adding them to favorites, and an ability to delete the news.
Technologies We Used to Develop a Sample App
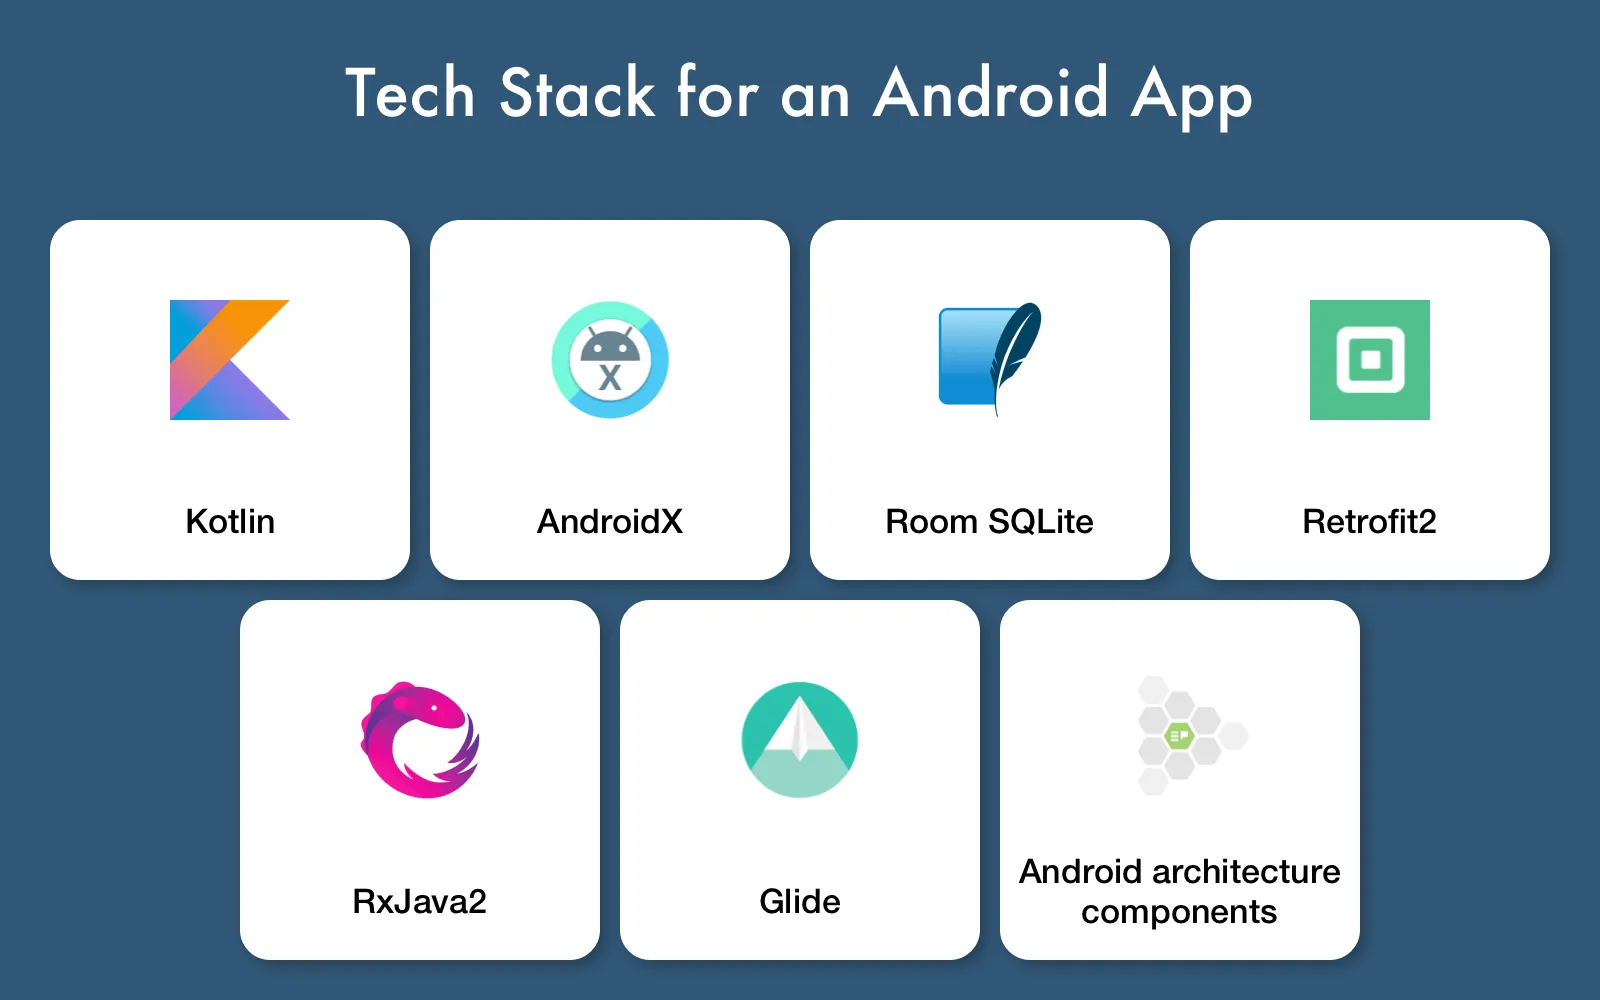
During the development process the following technologies are used:
- Kotlin. The programming language that allows writing less code and is completely compatible with Java.
- AndroidX. The main library used for this project.
- Room SQLite is the database.
- We use Stetho to create the ability to view data in the database.
- Retrofit2 along with RxJava2 is used to implement requests to the server and receive responses from it.
- Glide. It’s the big library for image processing.
- Android Architecture Components (LiveData, ViewModel, and Room) and ReactiveX (RxJava2, RxKotlin, and RxAndroid) are taken to build dependencies, dynamically change the data and desynchronize processes.
Technologies Used to Implement Android Clean Architecture
In this guide, we want to provide you with our own simplified way of building Android applications. We’ll explain the Android architecture in practice.
The Beginning of the Project
The first step is to connect AndroidX. Then in gradle.properties at the application level, it’s necessary to write:
android.enableJetifier=true
android.useAndroidX=true
The next thing to do is to replace dependencies from Android to AndroidX in the build.gradle at the app module level. Putting all dependencies to ext is considered a good practice. I mean out-of-the-box Kotlin versioning in build.gradle at the application level. Let’s add there gradle versioning:
buildscript {
    ext.kotlin_version = '1.3.0'
    ext.gradle_version = '3.2.1'

    repositories {
        google()
        jcenter()
        maven { url 'https://jitpack.io' }
        mavenCentral()
    }
    dependencies {
        classpath "com.android.tools.build:gradle:$gradle_version"
        classpath "org.jetbrains.kotlin:kotlin-gradle-plugin:$kotlin_version"

        // NOTE: Do not place your application dependencies here; they belong
        // in the individual module build.gradle files
    }
}
You need to create a separate extended file for the rest of dependencies. After that, you can put there all the dependencies without exceptions, including SDK versions. This way, we separate versioning and create an array of dependencies that we’ll be implemented in the build.gradle at the application level.
ext {
    compileSdkVersion = 28
    minSdkVersion = 22
    buildToolsVersion = '28.0.3'
    targetSdkVersion = 28

    appcompatVersion = '1.0.2'
    supportVersion = '1.0.0'
    supportLifecycleExtensionsVersion = '2.0.0'
    constraintlayoutVersion = '1.1.3'
    multiDexVersion = "2.0.0"

    testJunitVersion = '4.12'
    testRunnerVersion = '1.1.1'
    testEspressoCoreVersion = '3.1.1'

    testDependencies = [
            junit       : "junit:junit:$testJunitVersion",
            runner      : "androidx.test:runner:$testRunnerVersion",
            espressoCore: "androidx.test.espresso:espresso-core:$testEspressoCoreVersion"
    ]

    supportDependencies = [
            kotlin            : "org.jetbrains.kotlin:kotlin-stdlib-jdk7:$kotlin_version",
            appCompat         : "androidx.appcompat:appcompat:$appcompatVersion",
            recyclerView      : "androidx.recyclerview:recyclerview:$supportVersion",
            design            : "com.google.android.material:material:$supportVersion",
            lifecycleExtension: "androidx.lifecycle:lifecycle-extensions:$supportLifecycleExtensionsVersion",
            constraintlayout  : "androidx.constraintlayout:constraintlayout:$constraintlayoutVersion",
            multiDex          : "androidx.multidex:multidex:$multiDexVersion"
    ]
}
The version name and the name of the array are executed randomly. As a result, the implementation of the dependencies in the build.gradle at the application level will be done as follows:
apply plugin: 'com.android.application'
apply plugin: 'kotlin-android'
apply plugin: 'kotlin-android-extensions'
apply plugin: 'kotlin-kapt'

android {
    compileSdkVersion rootProject.ext.compileSdkVersion as Integer
    buildToolsVersion rootProject.ext.buildToolsVersion as String
dependencies {
implementation fileTree(dir: 'libs', include: ['*.jar'])
//Test
testImplementation testDependencies.junit
androidTestImplementation testDependencies.runner
androidTestImplementation testDependencies.espressoCore
//Support
implementation supportDependencies.kotlin
implementation supportDependencies.appCompat
implementation supportDependencies.recyclerView
implementation supportDependencies.design
implementation supportDependencies.lifecycleExtension
implementation supportDependencies.constraintlayout
implementation supportDependencies.multiDexAfter that, don’t forget to indicate multiDexEnabled true in the default configs. The number of used methods usually reach the allowed limit pretty fast.
Doing the same, we indicate all the dependencies of our app. Then, it’s important to add the permission for the Internet connection.
 <uses-permission android:name="android.permission.ACCESS_NETWORK_STATE" />
    <uses-permission android:name="android.permission.INTERNET" />
If there is no name at the manifest, it's high time to add one. Without the application name, Stetho can’t see the app and you won’t be able to look through the database.
The Creation of Basic Components
It’s important to mention that the MVVM or Model-View-ViewModel pattern was taken as the basis during the development of the basic architecture.
It’s high time to start the development.
Want to hire Android app developers? Learn about their responsibilities, hiring options, rates, and more.
The first thing you need to do is to create a class that will follow Application(). In this class, we’ll give access to the app’s context for it's further use.
@SuppressWarnings("all")
class App : Application() {

    companion object {
        lateinit var instance: App
            private set
    }

    override fun onCreate() {
        super.onCreate()
        instance = this
        Stetho.initializeWithDefaults(this)
        DatabaseCreator.createDatabase(this)
    }
}
Now it’s necessary to build the basic components of the app. ViewModel is good to start with because we’ll use it for every activity or fragment.
abstract class BaseViewModel constructor(app: Application) : AndroidViewModel(app) {

    override fun onCleared() {
        super.onCleared()
    }
}
Our app has quite simple functionality but we’ve decided to put three main LiveDatas in the ViewModel:
- LiveData that handles errors.
- LiveData that processes the loading displaying the progress bar.
- LiveData for processing the process of receipt and availability of data in the adapter to display the placeholder in their absence. We need this LiveData because our application has lots of lists.
val errorLiveData = MediatorLiveData<String>()
    val isLoadingLiveData = MediatorLiveData<Boolean>()
    val isEmptyDataPlaceholderLiveData = MediatorLiveData<Boolean>()
We will use Consumer to transfer the results of functions to LiveData.
In order to handle errors anywhere in the application, we need to create a consumer that will pass Throwable.message value to errorLiveData.
Moreover, in the BaseViewModel we need to create a method that will take LiveDatas. During processing this LiveData, we want to display the progress bar.
Our BaseViewModel will look like this:
abstract class BaseViewModel constructor(app: Application) : AndroidViewModel(app) {

    val errorLiveData = MediatorLiveData<String>()
    val isLoadingLiveData = MediatorLiveData<Boolean>()
    val isEmptyDataPlaceholderLiveData = MediatorLiveData<Boolean>()

    private var compositeDisposable: CompositeDisposable? = null

    protected open val onErrorConsumer = Consumer<Throwable> {
        errorLiveData.value = it.message
    }

    fun setLoadingLiveData(vararg mutableLiveData: MutableLiveData<*>) {
        mutableLiveData.forEach { liveData ->
            isLoadingLiveData.apply {
                this.removeSource(liveData)
                this.addSource(liveData) { this.value = false }
            }
        }
    }

    override fun onCleared() {
        isLoadingLiveData.value = false
        isEmptyDataPlaceholderLiveData.value = false
        clearSubscription()
        super.onCleared()
    }

    private fun clearSubscription() {
        compositeDisposable?.apply {
            if (!isDisposed) dispose()
            compositeDisposable = null
        }
    }
}
We are developing a simple app, so there is no reason to create several activities for two screens — the feed screen and the favorites screen. On the other hand, the example is intended to show the implementation of an optimal and easily scalable architecture, so let’s create a basic app.
Our application will be developed upon one activity and two fragments that we’ll inflate into the activity ‘container’.
Below you can see the XML file of our activity.
<?xml version="1.0" encoding="utf-8"?>
<FrameLayout xmlns:android="http://schemas.android.com/apk/res/android"
    android:layout_width="match_parent"
    android:layout_height="match_parent">

    <FrameLayout
        android:id="@+id/flContainer"
        android:layout_width="match_parent"
        android:layout_height="match_parent" />

    <include layout="@layout/include_placeholder"/>

    <include layout="@layout/include_progress_bar" />
</FrameLayout>
In this XML file, include_placeholder and include-progressbar look as follows:
<?xml version="1.0" encoding="utf-8"?>
<FrameLayout xmlns:android="http://schemas.android.com/apk/res/android"
    android:id="@+id/flProgress"
    android:layout_width="match_parent"
    android:layout_height="match_parent"
    android:background="@color/bg_black_40">

    <ProgressBar
        android:layout_width="wrap_content"
        android:layout_height="wrap_content"
        android:layout_gravity="center"
        android:background="@color/transparent" />
</FrameLayout><?xml version="1.0" encoding="utf-8"?>
<FrameLayout xmlns:android="http://schemas.android.com/apk/res/android"
android:id="@+id/flPlaceholder"
android:layout_width="match_parent"
android:layout_height="match_parent"
android:background="@color/bg_transparent">
<ImageView
android:layout_width="wrap_content"
android:layout_height="wrap_content"
android:layout_gravity="center"
android:background="@color/transparent"
android:src="@drawable/ic_business_light_blue_800_24dp" />
<TextView
android:layout_width="wrap_content"
android:layout_height="wrap_content"
android:layout_gravity="center"
android:layout_marginTop="40dp"
android:text="@string/empty_data"
android:textColor="@color/colorPrimary"
android:textStyle="bold" />
</FrameLayout>Our BaseActivity looks like this:
abstract class BaseActivity<T : BaseViewModel> : AppCompatActivity(), BackPressedCallback,
        ProgressViewCallback, EmptyDataPlaceholderCallback {

    protected abstract val viewModelClass: Class<T>
    protected abstract val layoutId: Int
    protected abstract val containerId: Int

    protected open val viewModel: T by lazy(LazyThreadSafetyMode.NONE) { ViewModelProviders.of(this).get(viewModelClass) }

    protected abstract fun observeLiveData(viewModel: T)

    override fun onCreate(savedInstanceState: Bundle?) {
        super.onCreate(savedInstanceState)
        setContentView(layoutId)
        startObserveLiveData()
    }

    private fun startObserveLiveData() {
        observeLiveData(viewModel)
    }
}
Let’s implement the ability to display all possible errors in the processes of our future activity. To simplify the process, let’s use the ordinary Toast.
protected open fun processError(error: String) = Toast.makeText(this, error, Toast.LENGTH_SHORT).show()After that, it’s important to pass the error message to the display method:
protected open val errorObserver = Observer<String> { it?.let { processError(it) } }In the basic Activity, we follow the value changes of errorLiveData that is located in the BaseViewModel. The method startObserveLiveData() is changing as you can see:
private fun startObserveLiveData() {
        observeLiveData(viewModel)
        with(viewModel) {
            errorLiveData.observe(this@BaseActivity, errorObserver)
        }
    }
Utilizing onErrorConsumer of the BaseViewModel as the onError handler, we’ll see a message about the error of the current method.
Let’s build interfaces for displaying the Progress and Placeholder in the right places of the application.
interface ProgressViewCallback {

    fun onShowProgress()

    fun onHideProgress()
}
Now it’s necessary to implement them into the basic Activity. Let’s create functions of assigning an ID to the Progressbar and Placeholder, and also initialize these views.
override fun onShowProgress() {
        vProgress?.visibility = View.VISIBLE
    }

    override fun onHideProgress() {
        vProgress?.visibility = View.GONE
    }

    override fun onShowPlaceholder() {
        vPlaceholder?.visibility = View.VISIBLE
    }

    override fun onHidePlaceholder() {
        vPlaceholder?.visibility = View.INVISIBLE
    }

    public override fun onStop() {
        super.onStop()
        onHideProgress()
    }
The last step is to set an ID for view in the onCreate method.
 if (hasProgressBar()) {
            vProgress = findViewById(progressBarId())
            vProgress?.setOnClickListener(null)
        }
        vPlaceholder = findViewById(placeholderId())
        startObserveLiveData()
We’ve described the development process of the BaseViewModel and BasicActivity. The same principle will be used while writing the basic fragment.
During the creation of each separate screen, it’s necessary to pay attention to the further scalability and possibility to make changes. So, it’s better to create a separate fragment with it's own ViewModel.
Note! If the fragments can be grouped into one cluster and business logic isn’t complex, some fragments can use one ViewModel.
Switching between fragments occurs using interfaces that we’ve implemented in Activity. In order to do this, each fragment should have a companion object{ } with the method of building a fragment object with the possibility of passing arguments to the Bundle:
companion object {
        fun newInstance() = FavoriteFragment().apply { arguments = Bundle() }
    }
The Solution Architecture
After creating the basic components, let’s move on with describing the architecture. It will be schematically similar to the well-known Uncle Bob architecture. But since we use RxJava2, we’ve gotten rid of the Boundaries interfaces (as a way to ensure the implementation of the Dependency Rule) in favor of the Observable and Subscriber.
Moreover, utilizing the Reactive Java tools, we’ve implemented data conversion for more flexible work with them. This change applies both working with server responses and cooperation with databases.
Developing an Android application and need extra developers to supplement your team? Drop us a line and our managers assist you in choosing the dedicated engineers.
In addition to the main model, we’ll develop the model of server response and a separate table model for Room. The conversion of data between these models allows us to make changes to the conversion process, convert server responses and instantly save the necessary data to the database before displaying them on the UI.
Fragments are responsible for the UI while ViewModels Fragments are in charge of the business logic execution. If the business logic concerns the whole activity, then Activity’s ViewModel is at the helm.
ViewModels get data from the provider by initializing it through val … by lazy {} if an immutable object is needed. After completing the business logic, it’s necessary to transfer data for changing the UI. So, we build a new MutableLiveData in the ViewModel that we’ll use in the observeLiveData() method of our fragment.
As you can see it’s quite simple.
An important component of our architecture is a data converter that is based on a simple conversion from one data type to another. To convert the RxJava data stream, SingleTransformer or FlowableTransformer can be used depending on the data type.
In our case, the interface and abstract class of the converter look like this:
interface BaseDataConverter<IN, OUT> {

    fun convertInToOut(inObject: IN): OUT

    fun convertOutToIn(outObject: OUT): IN

    fun convertListInToOut(inObjects: List<IN>?): List<OUT>?

    fun convertListOutToIn(outObjects: List<OUT>?): List<IN>?

    fun convertOUTtoINSingleTransformer(): SingleTransformer<IN?, OUT>

    fun convertListINtoOUTSingleTransformer(): SingleTransformer<List<OUT>, List<IN>>
}

abstract class BaseDataConverterImpl<IN, OUT> : BaseDataConverter<IN, OUT> {

    override fun convertInToOut(inObject: IN): OUT = processConvertInToOut(inObject)

    override fun convertOutToIn(outObject: OUT): IN = processConvertOutToIn(outObject)

    override fun convertListInToOut(inObjects: List<IN>?): List<OUT> =
            inObjects?.map { convertInToOut(it) } ?: listOf()

    override fun convertListOutToIn(outObjects: List<OUT>?): List<IN> =
            outObjects?.map { convertOutToIn(it) } ?: listOf()

    override fun convertOUTtoINSingleTransformer() =
            SingleTransformer<IN?, OUT> { it.map { convertInToOut(it) } }

    override fun convertListINtoOUTSingleTransformer() =
            SingleTransformer<List<OUT>, List<IN>> { it.map { convertListOutToIn(it) } }

    protected abstract fun processConvertInToOut(inObject: IN): OUT

    protected abstract fun processConvertOutToIn(outObject: OUT): IN
}
In this example, we’re using pretty basic conversions such as model-model, a list of models, etc.
Let’s start with the network, namely RestClient. The retrofitBuilder method will look as follows:
fun retrofitBuilder(): Retrofit = Retrofit.Builder()
            .baseUrl(BASE_URL)
            .addCallAdapterFactory(RxJava2CallAdapterFactory.create())
            .addConverterFactory(NullOrEmptyConverterFactory().converterFactory())
            .addConverterFactory(GsonConverterFactory.create(createGsonBuilder()))
            .client(createHttpClient())
            .build()
//base url
const val BASE_URL = "https://newsapi.org"While using the third-party APIs, there is always a possibility to receive an absolutely empty response from the server, and there can be a lot of reasons. However, the additionally created NullOrEmptyConverterFactory can handle these situations.
class NullOrEmptyConverterFactory : Converter.Factory() {

    fun converterFactory() = this

    override fun responseBodyConverter(type: Type?,
                                       annotations: Array<Annotation>,
                                       retrofit: Retrofit): Converter<ResponseBody, Any>? {
        return Converter { responseBody ->
            if (responseBody.contentLength() == 0L) {
                null
            } else {
                type?.let {
                    retrofit.nextResponseBodyConverter<Any>(this, it, annotations)?.convert(responseBody) }
            }
        }
    }
}
To create models, we need to start from API. As an example, we’ll use API from newsapi.org which is free for non-commercial use. This API has a rather extensive list of requested functionality but we’ll utilize only a part of it's functions. After a simple registration, we get access to API and our API key that is required for each request.
Let’s use as an endpoint. There are several suggested query, it’s better to select:
- q — a searching query;
- from — sorting from the date;
- to — sorting to date;
- sortBy — sorting by the selected criteria;
- apiKey.
After creating RestClient, we build an API interface with the Query selected for our application.
interface NewsApi {
    @GET(ENDPOINT_EVERYTHING)
    fun getNews(@Query("q") searchFor: String?,
                @Query("from") fromDate: String?,
                @Query("to") toDate: String?,
                @Query("sortBy") sortBy: String?,
                @Query("apiKey") apiKey: String?): Single<NewsNetworkModel>
}
//endpoints
const val ENDPOINT_EVERYTHING = "/v2/everything"We’ll get the response in the NewsNetworkModel:
data class NewsNetworkModel(@SerializedName("articles")
                            var articles: List<ArticlesNetworkModel>? = listOf())
data class ArticlesNetworkModel(@SerializedName("title")
var title: String? = null,
@SerializedName("description")
var description: String? = null,
@SerializedName("urlToImage")
var urlToImage: String? = null)The data from the whole response will be enough for displaying a list with a picture, a title, and a description.
In order to implement our architectural approach, let’s create some common models.
interface News {
    var articles: List<Article>?
}

class NewsModel(override var articles: List<Article>? = null) : News
interface Article {
var id: Long?
var title: String?
var description: String?
var urlToImage: String?
var isAddedToFavorite: Boolean?
var fragmentName: FragmentsNames?
}
class ArticleModel(override var id: Long? = null,
override var title: String? = null,
override var description: String? = null,
override var urlToImage: String? = null,
override var isAddedToFavorite: Boolean? = null,
override var fragmentName: FragmentsNames? = null) : ArticleSince the Article model will be used to link with the database and display the data in the adapter, we should add two fields that we will need further to change UI items in the list.
When everything is ready for the request, we create converters for network models. They will be utilized in the request for receiving news via the network module.
The converters are developed in the reverse order from nesting and, accordingly, convert in the direct order. As a result, the first converter is created on the Article and then on the News.
There are examples below:
interface ArticlesBeanConverter

class ArticlesBeanDataConverterImpl : BaseDataConverterImpl<ArticlesNetworkModel, Article>(), ArticlesBeanConverter {

    override fun processConvertInToOut(inObject: ArticlesNetworkModel): Article = inObject.run {
        ArticleModel(null, title, description, urlToImage, false, FragmentsNames.NEWS)
    }

    override fun processConvertOutToIn(outObject: Article): ArticlesNetworkModel = outObject.run {
        ArticlesNetworkModel(title, description, urlToImage)
    }
}
interface NewsBeanConverter
class NewsBeanDataConverterImpl : BaseDataConverterImpl<NewsNetworkModel, News>(), NewsBeanConverter {
private val articlesConverter by lazy { ArticlesBeanDataConverterImpl() }
override fun processConvertInToOut(inObject: NewsNetworkModel): News = inObject.run {
NewsModel(articles?.let { articlesConverter.convertListInToOut(it) })
}
override fun processConvertOutToIn(outObject: News): NewsNetworkModel = outObject.run {
NewsNetworkModel(articles?.let { articlesConverter.convertListOutToIn(it) })
}
}As you can see above, during the process of converting a News object, the list of Article objects is also converted.
When the converters on the network models are created, we move on with building the Module (Network Repository). Since usually there are more than or two API interfaces, it’s better to create a BaseModule, typed API, Network Model, and Converter Model.
It looks like this:
abstract class BaseNetworkModule<A, NM, M>(val api: A, val dataConverter: BaseDataConverter<NM, M>)Accordingly, on the NewsModule it looks as follows:
interface NewsModule {

    fun getNews(fromDate: String? = null, toDate: String? = null, sortBy: String? = null): Single<News>
}

class NewsModuleImpl(api: NewsApi) : BaseNetworkModule<NewsApi, NewsNetworkModel, News>(api, NewsBeanDataConverterImpl()), NewsModule {

    override fun getNews(fromDate: String?, toDate: String?, sortBy: String?): Single<News> =
            api.getNews(searchFor = SEARCH_FOR, fromDate = fromDate, toDate = toDate, sortBy = sortBy, apiKey = API_KEY)
                    .compose(dataConverter.convertOUTtoINSingleTransformer())
                    .onErrorResumeNext(NetworkErrorUtils.rxParseError())
}
The API key is an important parameter for this API to make a request (to any endpoint). Therefore, in advance, we create the possibility not to specify all optional parameters, resetting them by default.
As we’ve shown above, we use data conversion during processing the response.
Let’s move on and start working with the database. Let’s develop an application database, call it AppDatabase and inherit from RoomDatabase().
To implement the database, you need to build DatabaseCreator that has to be initialized in the App Class.
object DatabaseCreator {

    lateinit var database: AppDatabase
    private val isDatabaseCreated = MutableLiveData<Boolean>()
    private val mInitializing = AtomicBoolean(true)

    @SuppressWarnings("CheckResult")
    fun createDatabase(context: Context) {
        if (mInitializing.compareAndSet(true, false).not()) return
        isDatabaseCreated.value = false
        Completable.fromAction { database = Room.databaseBuilder(context, AppDatabase::class.java, DB_NAME).build() }
                .compose { completableToMain(it) }
                .subscribe({ isDatabaseCreated.value = true }, { it.printStackTrace() })
    }
}
Then, initialize Stetho and the database in the onCreate() method.
override fun onCreate() {
        super.onCreate()
        instance = this
        Stetho.initializeWithDefaults(this)
        DatabaseCreator.createDatabase(this)
    }
Once our database is created, it’s necessary to build a BaseDao with the only insert() method.
@Dao
interface BaseDao<in I> {

    @Insert(onConflict = OnConflictStrategy.REPLACE)
    fun insert(obj: I)
}
According to the application’s idea, we’ll be able to save the news we like, receive a list of saved news, delete the saved news by it's ID, and delete all the news from the table.
So, our NewsDao looks like this:
@Dao
interface NewsDao : BaseDao<NewsDatabase> {

    @Query("SELECT * FROM $NEWS_TABLE")
    fun getNews(): Single<List<NewsDatabase>>

    @Query("DELETE FROM $NEWS_TABLE WHERE id = :id")
    fun deleteNewsById(id: Long)

    @Query("DELETE FROM $NEWS_TABLE")
    fun deleteFavoriteNews()
}
Below you can see the NewsTable:
@Entity(tableName = NEWS_TABLE)
data class NewsDatabase(@PrimaryKey var id: Long?,
                        var title: String?,
                        var description: String?,
                        var urlToImage: String?)
After creating the table, let’s link it with the Database.
@Database(entities = [NewsDatabase::class], version = DB_VERSION)
abstract class AppDatabase : RoomDatabase() {

    abstract fun newsDao(): NewsDao
}
Now we can work with the Database: store and extract data from it.
As for the module (Network Repository), it’s better to create a model converter (database table model).
interface NewsDatabaseConverter

class NewsDatabaseDataConverterImpl : BaseDataConverterImpl<Article, NewsDatabase>(), NewsDatabaseConverter {

    override fun processConvertInToOut(inObject: Article): NewsDatabase =
            inObject.run {
                NewsDatabase(id, title, description, urlToImage)
            }

    override fun processConvertOutToIn(outObject: NewsDatabase): Article =
            outObject.run {
                ArticleModel(id, title, description, urlToImage, true, FragmentsNames.FAVORITES)
            }
}
Working with different tables means the presence of the BaseRepository. So, it’s vital to write it. The simplest form will be enough for our application.
abstract class BaseRepository<M, DBModel> {

    protected abstract val dataConverter: BaseDataConverter<M, DBModel>
    protected abstract val dao: BaseDao<DBModel>
}
After building the BaseRepository, you need to develop NewsRepository.
interface NewsRepository {

    fun saveNew(article: Article): Single<Article>

    fun getSavedNews(): Single<List<Article>>

    fun deleteNewsById(id: Long): Single<Unit>

    fun deleteAll(): Single<Unit>
}

object NewsRepositoryImpl : BaseRepository<Article, NewsDatabase>(), NewsRepository {

    override val dataConverter by lazy { NewsDatabaseDataConverterImpl() }
    override val dao by lazy { DatabaseCreator.database.newsDao() }

    override fun saveNew(article: Article): Single<Article> =
            Single.just(article)
                    .map { dao.insert(dataConverter.convertInToOut(it)) }
                    .map { article }

    override fun getSavedNews(): Single<List<Article>> =
            dao.getNews().compose(dataConverter.convertListINtoOUTSingleTransformer())

    override fun deleteNewsById(id: Long): Single<Unit> =
            Single.just(dao.deleteNewsById(id))

    override fun deleteAll(): Single<Unit> =
            Single.just(dao.deleteFavoriteNews())
}
When the necessary module and repository are created, the data should move through the application provider. The provider always requests the information either from the network or from the database depending on the needs. Moreover, the provider should unite both repositories. Taking into account the possibility of different modules and repositories, we’ll create a simple BaseProvider.
abstract class BaseProvider<NM, DBR> {

    val repository: DBR = this.initRepository()

    val networkModule: NM = this.initNetworkModule()

    protected abstract fun initRepository(): DBR

    protected abstract fun initNetworkModule(): NM
}
Then the NewsProvider will look like this:
interface NewsProvider {

    fun loadNewsFromServer(fromDate: String? = null, toDate: String? = null, sortBy: String? = null): Single<News>

    fun saveNewToDB(article: Article): Single<Article>

    fun getSavedNewsFromDB(): Single<List<Article>>

    fun deleteNewsByIdFromDB(id: Long): Single<Unit>

    fun deleteNewsFromDB(): Single<Unit>
}

object NewsProviderImpl : BaseProvider<NewsModule, NewsRepositoryImpl>(), NewsProvider {

    override fun initRepository() = NewsRepositoryImpl

    override fun initNetworkModule() = NewsModuleImpl(RestClient.retrofitBuilder().create(NewsApi::class.java))

    override fun loadNewsFromServer(fromDate: String?, toDate: String?, sortBy: String?) = networkModule.getNews(fromDate, toDate, sortBy)

    override fun saveNewToDB(article: Article) = repository.saveNew(article)

    override fun getSavedNewsFromDB() = repository.getSavedNews()

    override fun deleteNewsByIdFromDB(id: Long) = repository.deleteNewsById(id)

    override fun deleteNewsFromDB() = repository.deleteAll()
}
So, now we can easily get a list of news. We just need to declare all our provider’s methods in NewsViewModel for further use.
val loadNewsSuccessLiveData = MutableLiveData<News>()
    val loadLikedNewsSuccessLiveData = MutableLiveData<List<Article>>()
    val deleteLikedNewsSuccessLiveData = MutableLiveData<Boolean>()

    private val loadNewsSuccessConsumer = Consumer<News> { loadNewsSuccessLiveData.value = it }
    private val loadLikedNewsSuccessConsumer = Consumer<List<Article>> { loadLikedNewsSuccessLiveData.value = it }
    private val deleteLikedNewsSuccessConsumer = Consumer<Unit> { deleteLikedNewsSuccessLiveData.value = true }

    private val dataProvider by lazy { NewsProviderImpl }

    init {
isLoadingLiveData.apply { addSource(loadNewsSuccessLiveData) { value = false } }@SuppressLint("CheckResult")
fun loadNews(fromDate: String? = null, toDate: String? = null, sortBy: String? = null) {
isLoadingLiveData.value = true
isEmptyDataPlaceholderLiveData.value = false
dataProvider.loadNewsFromServer(fromDate, toDate, sortBy)
.compose(RxUtils.ioToMainTransformer())
.subscribe(loadNewsSuccessConsumer, onErrorConsumer)
}
@SuppressLint("CheckResult")
fun saveLikedNew(article: Article) {
Single.fromCallable { Unit }
.flatMap { dataProvider.saveNewToDB(article) }
.compose(RxUtils.ioToMainTransformerSingle())
.subscribe({}, { onErrorConsumer })
}
@SuppressLint("CheckResult")
fun removeLikedNew(id: Long) {
Single.fromCallable { Unit }
.flatMap { dataProvider.deleteNewsByIdFromDB(id) }
.compose(RxUtils.ioToMainTransformerSingle())
.subscribe({}, { onErrorConsumer })
}
@SuppressLint("CheckResult")
fun loadLikedNews() {
Single.fromCallable { Unit }
.flatMap { dataProvider.getSavedNewsFromDB() }
.compose(RxUtils.ioToMainTransformerSingle())
.subscribe(loadLikedNewsSuccessConsumer, onErrorConsumer)
}
@SuppressLint("CheckResult")
fun removeLikedNews() {
Single.fromCallable { Unit }
.flatMap { dataProvider.deleteNewsFromDB() }
.compose(RxUtils.ioToMainTransformerSingle())
.subscribe(deleteLikedNewsSuccessConsumer, onErrorConsumer)
}Having declared all the methods executing business logic in the ViewModel, we’ll call the method from the fragment. Then in the observeLiveData(), it’s necessary to process the results of each declared LiveData.
To make the implementation easier, we’ve chosen ‘Apple’ in the search parameters SEARCH_FOR. After that, we’ll sort the items by popularity tag. If needed, you may add a minimum functionality to change these parameters.
Since newsapi.org doesn't provide news ID, we’ve decided to use the ID of the element in the list as ID. Sorting by the popularity tag is also implemented via API. However, to avoid rewriting data with the same ID in the database, it’s better to check the data before loading the news. If the database is empty, we’ll load a new list. On the contrary, we’ll display the notification.
Let’s call NewsFragment method:
private fun loadLikedNews() {
        viewModel.loadLikedNews()
    }
Since our database is empty, the loadNews() method will start. As a result, in the viewModel.loadNewsSuccessLiveData.observe(..){news→ }, we’ll get the list of the news and transfer it to the adapter:
isEmptyDataPlaceholderLiveData.value = news.articles?.isEmpty()
                with(newsAdapter) {
                    news.articles?.toMutableList()?.let {
                        clear()
                        addAll(it)
                    }
                    notifyDataSetChanged()
                }
                loadNewsSuccessLiveData.value = null
Having run the app, we’ll get the following result:
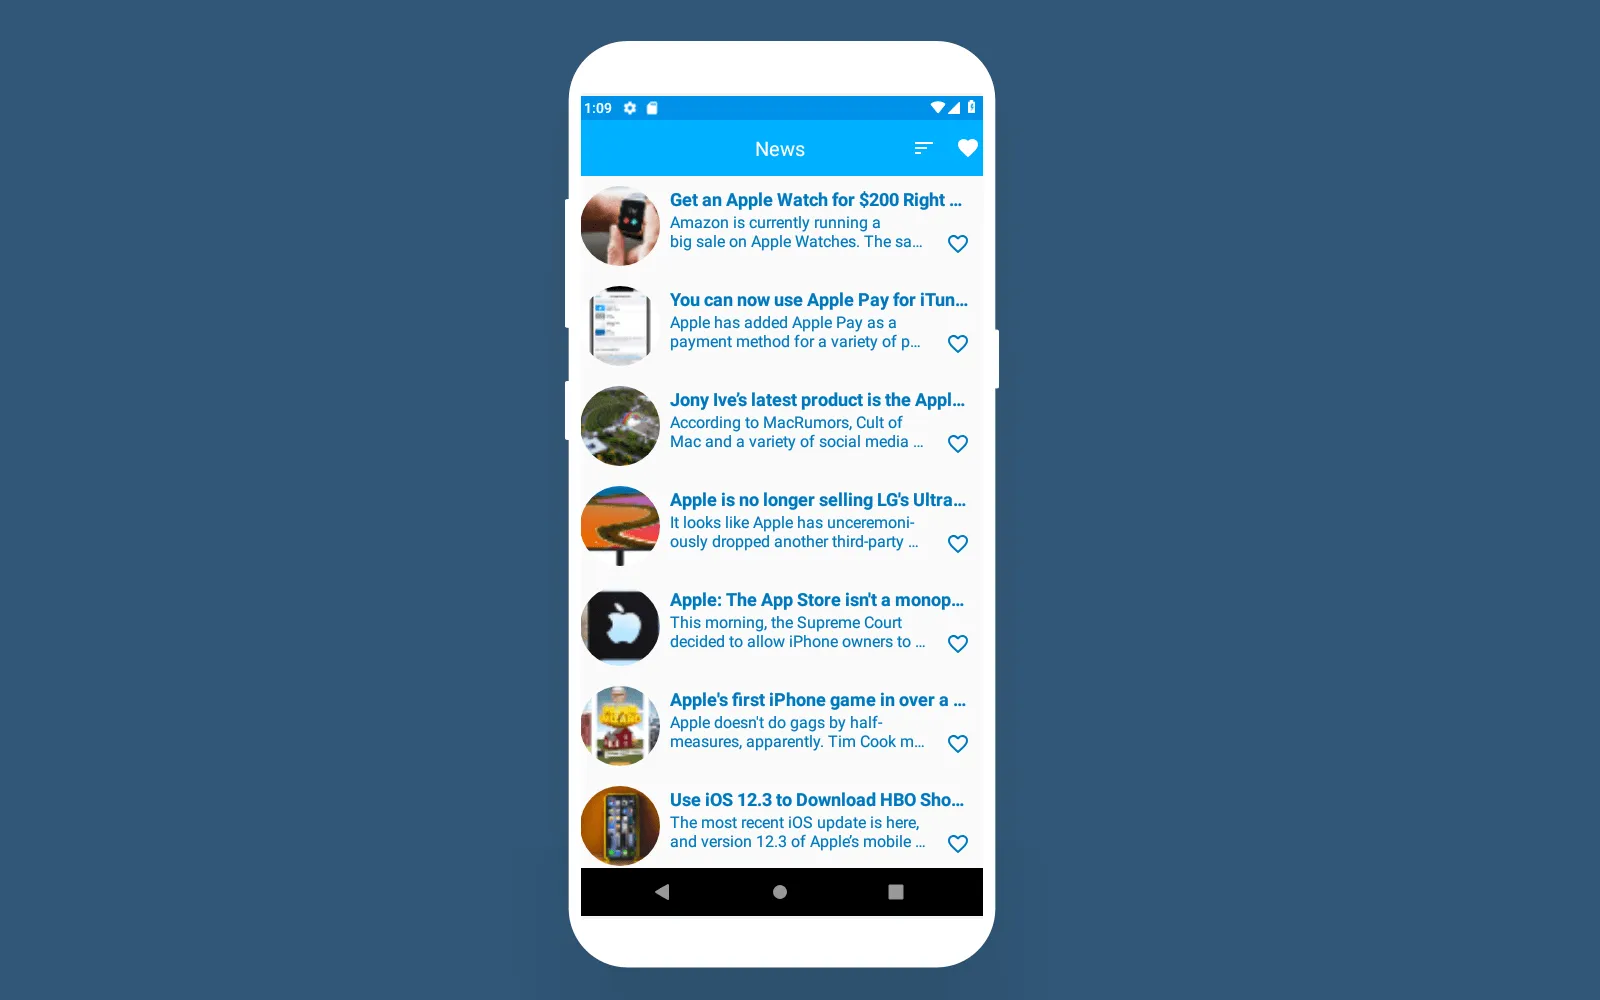
The List of the News
In the toolbar menu, there are two options — to sort news and to open favorites. Let’s sort the list by popularity and get the following result:
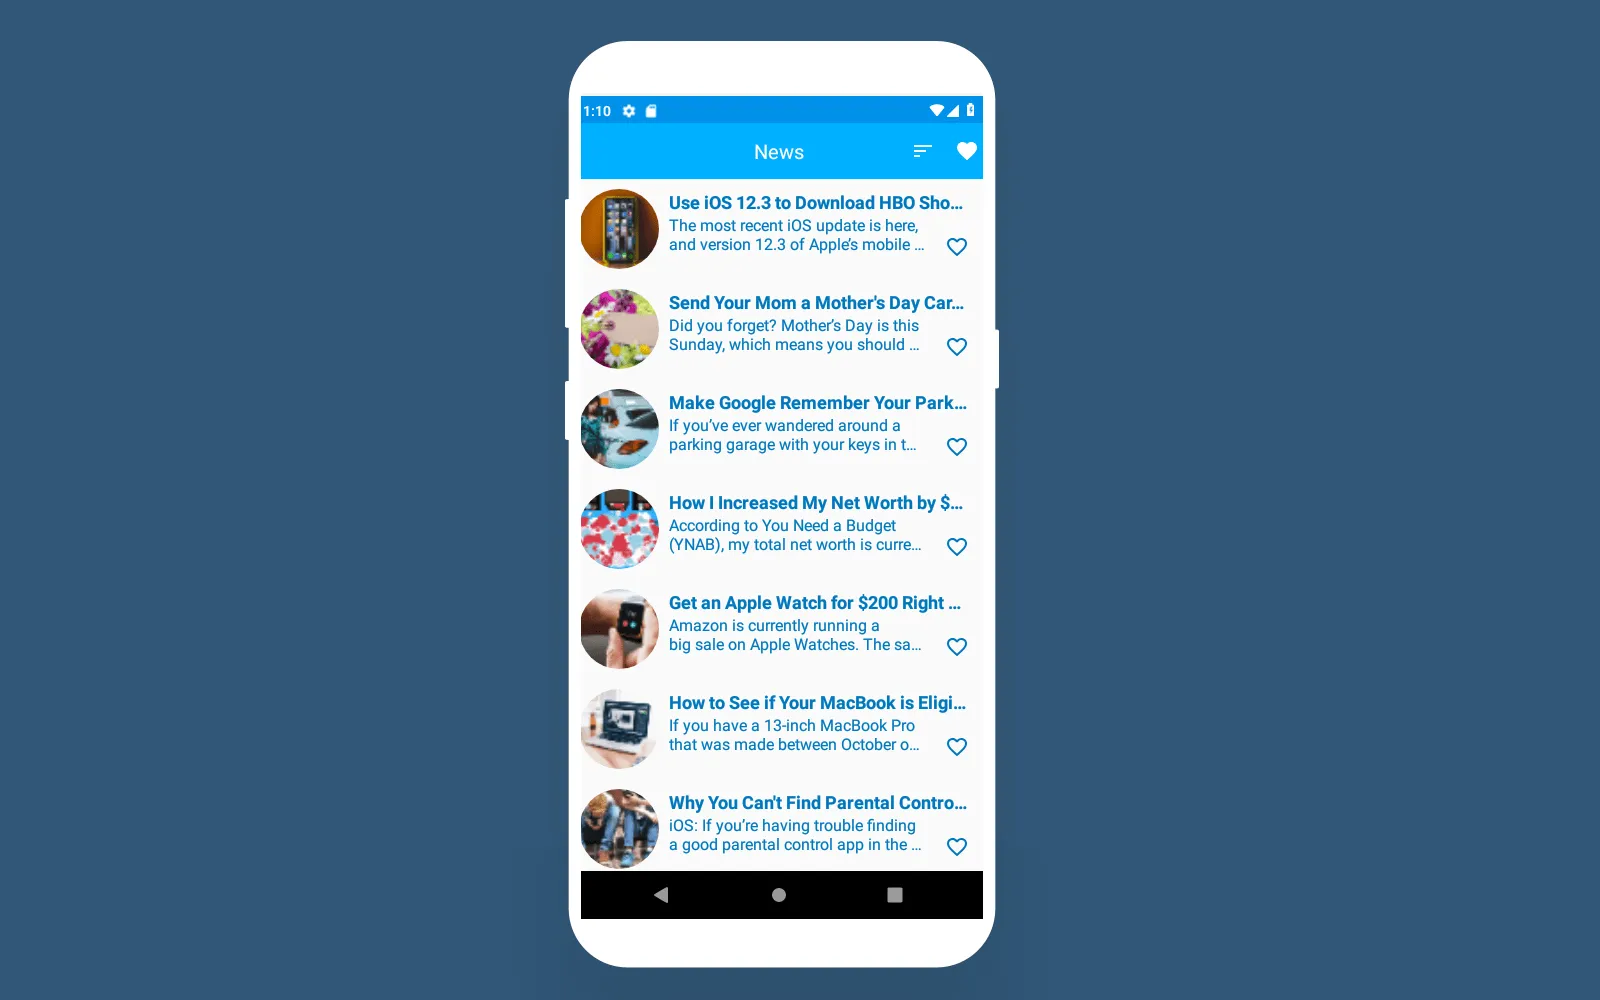
The List Sorted by Popularity
If we open favorites, we’ll see only the placeholder because there are no data on the database. The screen looks like this:

Favorites
The UI fragment of Favorites has only one screen to show news that we like. Moreover, it has only one option to clear the database. If you press ‘Like’, the screens will look as follows:

News in the List of Favorites
As it was mentioned above, two additional fields can be added to the Common Model. We use these fields to display the data in the adapter. As you can see, the elements from the list of news don’t have the ability to be added to favorites.
var isAddedToFavorite: Boolean?
    var fragmentName: FragmentsNames?
So, if you press ‘Like’ once again, the item will be removed from favorites.
Why Did We Simplify the Clean Android Architecture?
So, we’ve shown you an understandable way to develop an Android app. Of course, we’ve tried to follow the main principles of Clean Android App Architecture but making it easy-to-understand and presenting our own implementation.
What are the main differences between Uncle Bob’s Clean Architecture and our architectural solution? Let’s look at the Clean Android Architecture scheme:
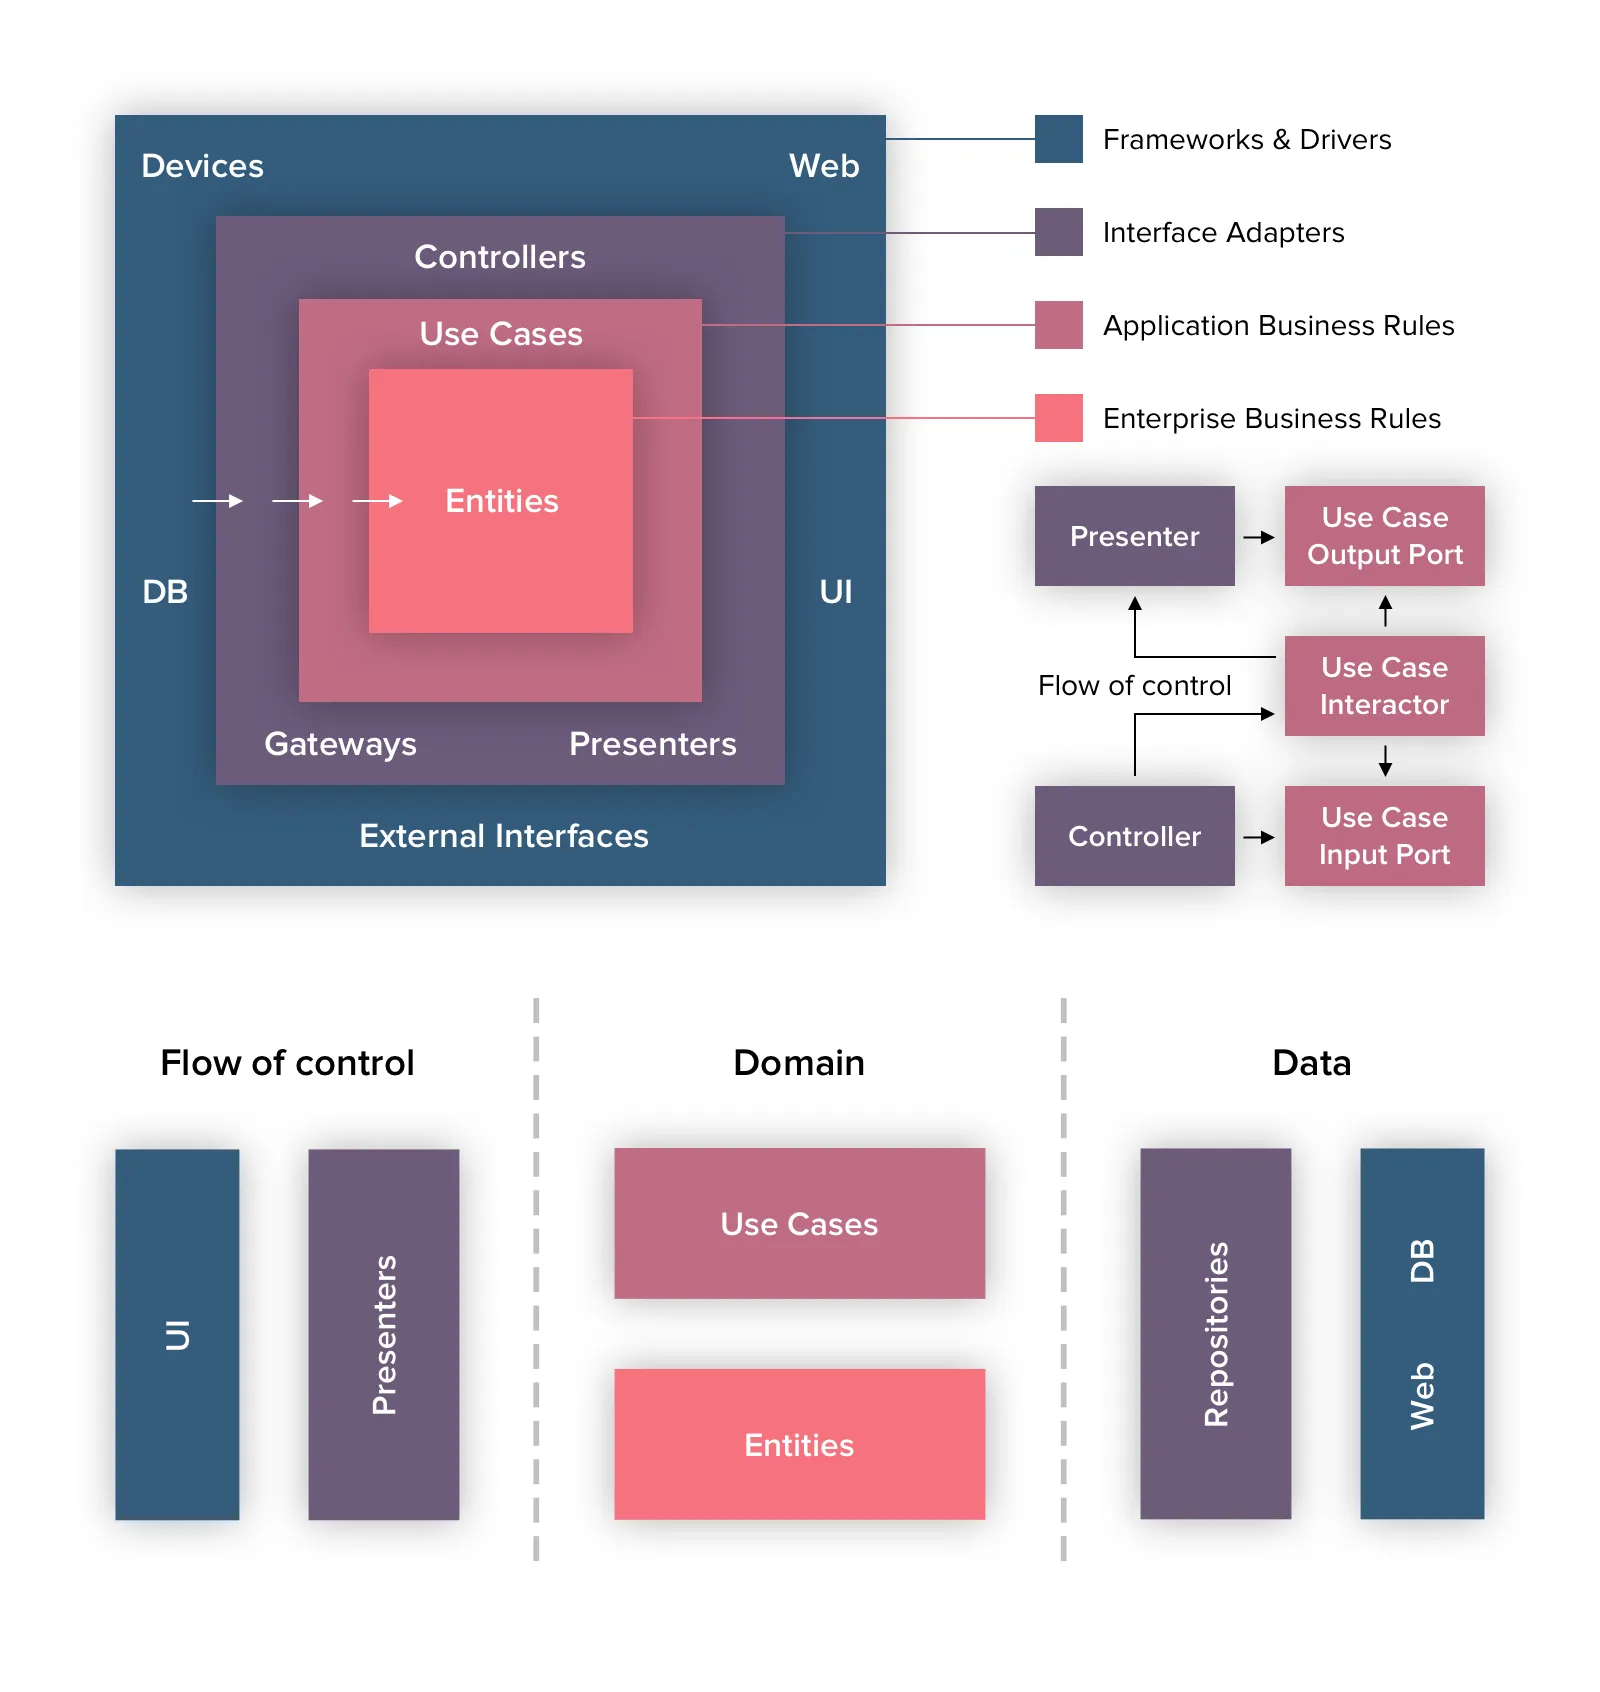
Clean Android Architecture by Uncle Bob
The Event goes to the Presenter and then moves to the Use Case. After that, the Use Case makes a request to the Repository. Repository gets the data, creates Entity, and moves it to the UseCase. As a result, the Use Case receives all necessary Entity. After implementing the business logic, we get the result that is passed back to the Presenter. Thereafter, the Presenter passes the result to the UI.
There is a diagram below. You can see that the Controller calls methods from the Input Port that implements Use Case. Then, the Output Port interface accepts this response and it’s implemented by the Presenter.
Use Case doesn’t depend on the presenter. Instead, it depends on the interface in it's layer that doesn’t violate the Dependency Rule. So, the Presenter should implement this interface.
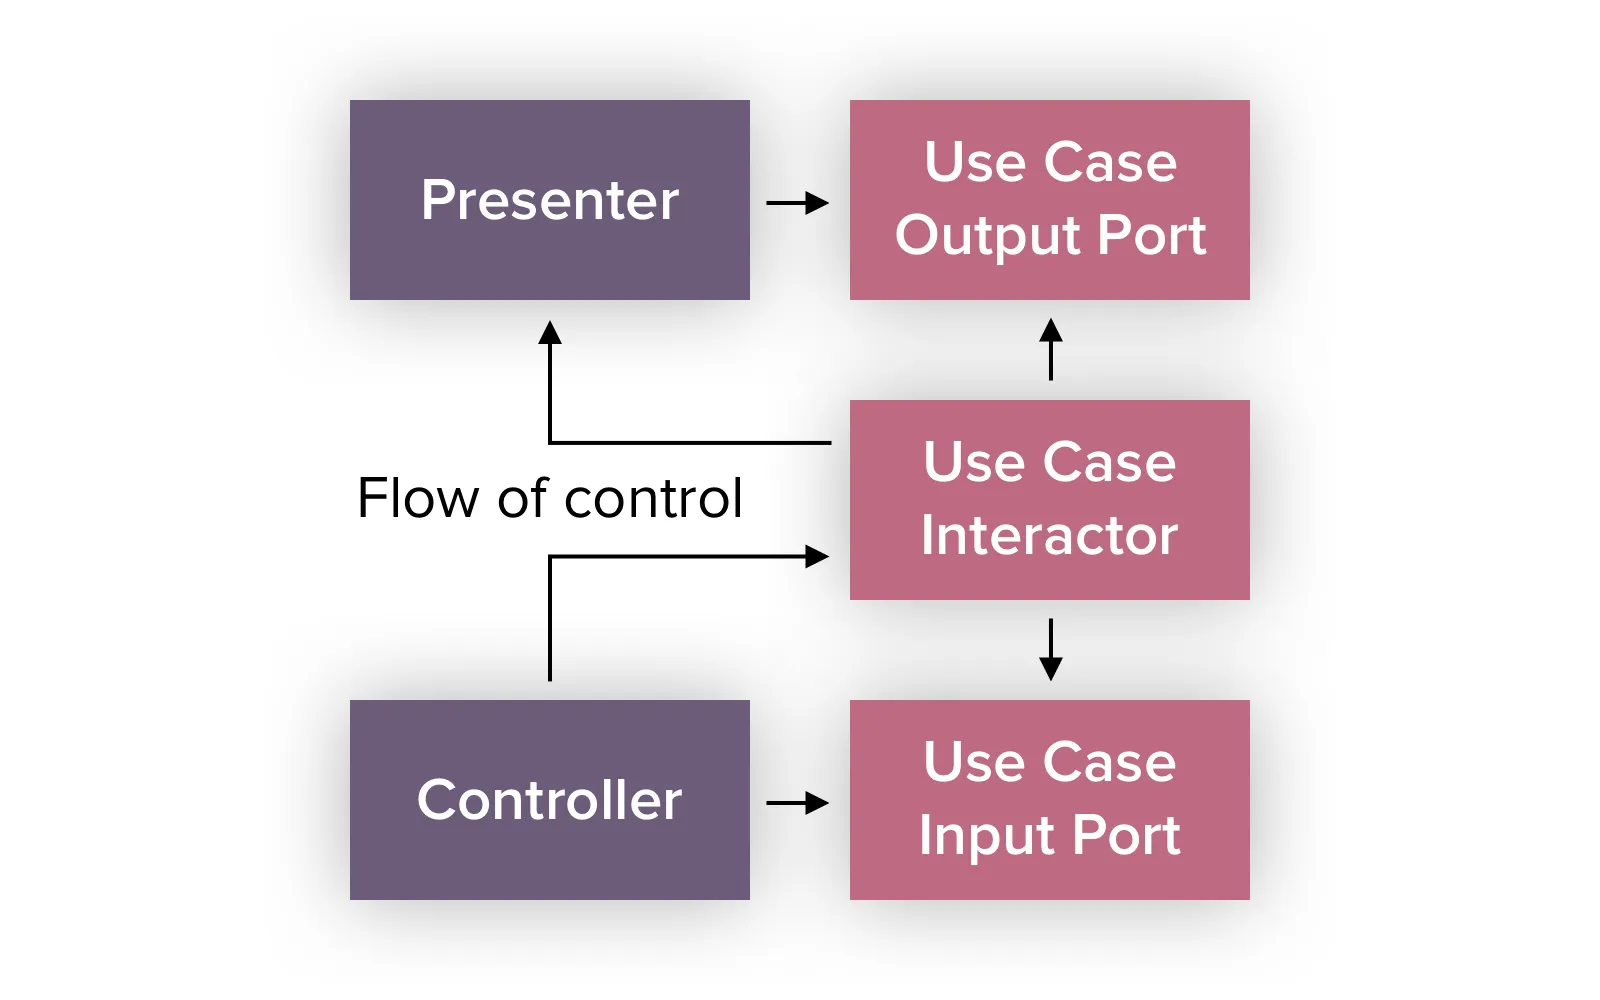
Clean Android Architecture by Uncle Bob
What is an Entity in the Clean Architecture? In fact, it’s everything that doesn’t depend on the particular application but, at the same time, is common to many apps. However, in the case of mobile development, these are objects of a business application containing the most general and high-level rules (business logic).
In our view, Gateways is the Repository for working with the database and the Module for the network. We’ve got rid of the Controller because the Clean Android Architecture was originally developed to structure business apps of high complexity. The DataConverter does the Controller’s functions.
The ViewModels instead of Presenters pass information into Fragments for UI processing. In our approach, we still follow the Dependency Rule. As a result, the changes into the outer layer don’t affect the internal one.
The use of such technologies as RxJava2, KotlinRx, Kotlin LiveData makes solving of assigned tasks more structured easy to understand for a developer, while the code is easily readable and scalable.
Let’s Talk
One of the best options to expand your team fast and for less money is to hire dedicated developers from an Android app development company like Cleveroad. We’re located in Eastern Europe and charge $50/h. Just to compare, rates in the USA usually starts with $100 per working hour.
There are a lot of reliable vendors in Europe as well. But the cost of IT outsourcing in Europe varies by region. For example, the app developers from Central Europe (e.g. Germany, Netherlands) charge between $68 and $99 per hour on average.
If you are looking for Android developers to expand your in-house team, feel free to get in touch with us to hire highly qualified software engineers.
By the way, you may check our portfolio to find out more about our previous projects and read what our clients think about us on Clutch or GoodFirms.

Evgeniy Altynpara is a CTO and member of the Forbes Councils’ community of tech professionals. He is an expert in software development and technological entrepreneurship and has 10+years of experience in digital transformation consulting in Healthcare, FinTech, Supply Chain and Logistics
Give us your impressions about this article
Give us your impressions about this article