WebRTC: Step-By-Step Implementation of Video Conference
Updated 06 Sep 2023
5 Min
9946 Views
WebRTC allows you to organize video / audio communication between users with the help of supported web browsers. This is an open source technology. It is quite new and grows rapidly. Under certain conditions, the majority of the most popular browsers support it. For example, the latest version of Google Chrome enables access to media devices (web-camera and microphone) only for the sites which have an SSL certificate. These are secure websites deploying HTTPS. Safari does not give access to media devices at all. However, this problem can be solved by using the plugin which you can download here.
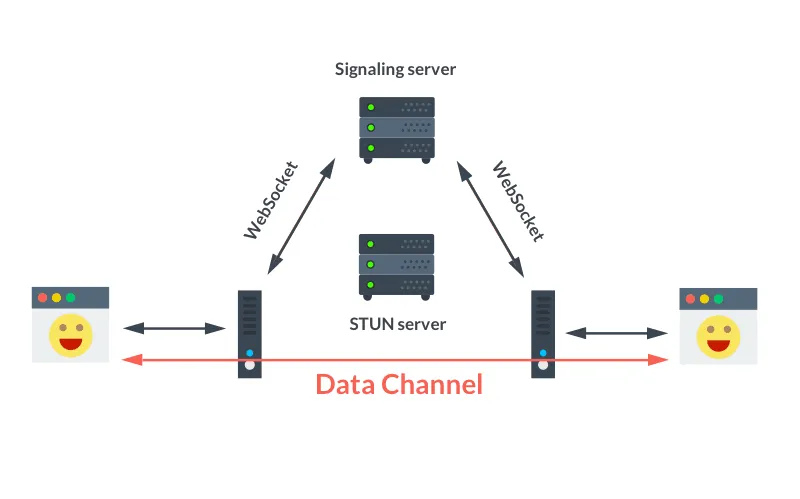
To implement the connection between two clients it is necessary that they identify each other. For that, you should use a layer introduced by the signaling server. To implement it, use a web socket technology.
WebRTC
See also: How To Develop a Live Streaming App?
Working Process
To consider the process of implementation, let's take a look at the live project. The server is written in nodeJs with the web sockets covered into the socket.io library. The front end is implemented on the basis of AngularJS framework.
Step 1: Support and request sending
When two users try to establish the connection, first of all, you have to check if a browser or OS supports the access to the media device.
setupRTC is a feature that checks whether the browser supports webRTC technology and whether the access to media devices is opened. If the above conditions are met, the PeerConnection object is initialized and the handlers are declared.
The code of the function is shortened as much as possible. However, the logic of the process is displayed correctly.
startCall - this function starts the check of webRTC support and initialization on the client side. It generates the 'callRequest' event on the server by means of socket.io library.
targetId - this is the user identifier in the database which is to receive the connection request.
enableSelfVideo - this function turns on the user's camera, takes video stream, and displays the stream to the user via, for example, HTML5 player. Also, this function transmits the stream to the object PeerConnection - $rootScope.pc.addStream(stream).
function setupRTC(targetId) {

    var isSupported = false;

    navigator.getUserMedia = navigator.getUserMedia ||
        navigator.webkitGetUserMedia ||
        navigator.mozGetUserMedia;

    window.PeerConnection = window.RTCPeerConnection ||
        window.mozRTCPeerConnection ||
        window.webkitRTCPeerConnection;

    window.IceCandidate = window.RTCIceCandidate ||
        window.mozRTCIceCandidate ||
        window.webkitRTCIceCandidate;

    window.SessionDescription = window.RTCSessionDescription ||
        window.mozRTCSessionDescription ||
        window.webkitRTCSessionDescription;

    isSupported = navigator.getUserMedia && window.PeerConnection && window.SessionDescription;

    if (isSupported) {
        var configuration = {
            "iceServers": [
                {url: 'stun server url'},
                {
                    url: 'turn server url',
                    username: 'turn server username',
                    credential: 'turn server key'
                }
            ]
        };
        //save Peer connection object to angular $rootScope to global access.
        $rootScope.pc = new PeerConnection(configuration);


        //add events handlers
        $rootScope.pc.onicecandidate = function (e) {
            if (e.candidate) {
                $rootScope.io.emit('rtc', {
                    targetId: targetId,
                    type: 'candidate',
                    label: e.candidate.sdpMLineIndex,
                    id: e.candidate.sdpMid,
                    candidate: e.candidate.candidate
                });
            }
        };

        $rootScope.pc.onaddstream = function (e) {
            // here should be code for processing successful connection
            // for example save stream url to variable and insert it to HTML5 video player

            $rootScope.stream = e.stream
        };

        $rootScope.pc.oniceconnectionstatechange = function () {
            //if interrupted connection
            if ($rootScope.pc && $rootScope.pc.iceConnectionState == 'disconnected') {
                console.log('peer connection interrupted');
                // here should be code for handler of interrupted connection
                // for example hide video player
            }
        };
    }

    return isSupported;
}


startCall = function (targetId) {

    var isSupported = setupRTC(targetId);

    if (isSupported) {
        enableSelfVideo(function () {
            $rootScope.io.emit('callRequest', {
                type: 'video',
                targetId: targetId
            });
        });
    } else {
        alert('UserMedia or WebRTC is not supported');
    }
};

function enableSelfVideo(callback) {

        navigator.getUserMedia({audio: true, video: true}, function (stream) {

            $rootScope.pc.addStream(stream);
            callback();

        }, function (err) {
            alert(err)
        });
    }
Step 2: Processing user's response
Once the connection request is sent successfully, you should notify a customer who is to accept the call. The server receives the signal alerting that client A wants to create a conference (in our case, video conference) with the client B by means of web sockets. At this stage, we can perform the necessary checks, for example, make sure that user A is not on the ban list of the user B.
onRequest - a function that processes the callRequest event on the server.
In the example, it's options are cut down to a minimum - all the business logic is removed. Bear in mind that in real projects this is a very important stage. It is in charge of performing the checks which go before the successful connection of two users.
Probably, the most important thing in this phase is to check whether user B is online. In case he/she is offline, the request will not be received. In it's turn, user A will not get a response and will stay in a standby mode.
function onRequest(io, socket) {
    return function (data) {

        data.userId = socket.user.id;

        socket.to('User:' + data.targetId).emit('callRequest', data);

    };
}
Next, the client side of the user B receives a server request to the callRequest socket event. The request contains the information about who is calling. If the user accepts the call or the client side accepts it automatically (it depends on the implementation), the client should perform the same checks as for the access to media devices which were described above (about the initialization on the client side of the user A).
var callAccept = function (targetId) {
            var isSupported = setupRTC(targetId);

            if (isSupported) {
                enableSelfVideo(function () {
                    $rootScope.io.emit('callRequest', {
                        type: 'video',
                        targetId: targetId
                    });
                });
            } else {
                $rootScope.io.emit('callDecline', {
targetId: targetId,
reason: 'some reason'
});
            }
        }
CallDecline event sends a signal to the server informing it that the call is over. The server notifies client A about it. Afterward, client A processes the request.
If the access to media devices is received successfully, we send a notification to the server that the call is accepted successfully - callAccept. In it's turn, the server notifies client A about it.
function onAccept(io, socket) {
    return function (data) {

        data.userId = socket.user.id;

        socket.to('User:' + data.targetId).emit('callAccept', data);

    };
}
Step 3. Video conference initialization
Once the call is successfully accepted by the client B, client A sends the 'offer' - a special message to request establishing the connection between users.
function onCallAccept() {
            $rootScope.pc.createOffer(function (description) {
                $rootScope.pc.setLocalDescription(description, function () {
                    description.type = 'offer';
                    $rootScope.io.emit('rtc', description);
                }, onError);
            }, onError, mediaConstraints);
        }
At this point, the server acts as a routing gateway. Since no business logic is needed and the handler of special messages is one for all, the server simply accepts the messages and sends them to the target client.
function onRtc(io, socket) {
    return function(data){

        data.fromId = socket.user.id;
        data.toId = socket.interlocutorId;

        socket.to('User:'+socket.interlocutorId).emit('rtc', data);
    };
}
socket.user.id - ID of the user who sends the message
In this implementation, the user's data is stored on the server in the 'socket' object, however, you can keep it anywhere: in the database, RAM, etc.
All the messages both to the client and server sides are sent at the rtc event.
On the client side, the handler looks like this:
function onRtc(data) {
            switch (data.type) {
                case 'offer':
                    onRtcOffer(data);
                    break;
                case 'answer':
                    onRtcAnswer(data);
                    break;
                case 'candidate':
                    onRtcCandidate(data);
                    break;
            }
        }

function onRtcOffer(data) {
            $rootScope.pc.setRemoteDescription(new SessionDescription(data), function () {
                $rootScope.pc.createAnswer(function (description) {
                    $rootScope.pc.setLocalDescription(new SessionDescription(description), function () {
                        description.type = 'answer';
                        description.toId = data.fromId;
                        console.log('sending answer');
                        $rootScope.io.emit('rtc', description);
                    }, onError);
                }, onError, mediaConstraints);
            }, onError);
        }

        function onRtcAnswer(data) {
            console.log('received answer');
            $rootScope.pc.setRemoteDescription(new SessionDescription(data), function () {
            }, onError);
        }

        function onRtcCandidate(data) {
            console.log('received candidate');
            var candidate = new RTCIceCandidate({
                sdpMLineIndex: data.label,
                candidate: data.candidate
            });
            $rootScope.pc.addIceCandidate(candidate);
        }
This code establishes a direct connection between two clients by means of webRTC. All the events are executed successively client by client.
Firstly, 'offer' is sent, secondly - 'answer', and then 'candidate' is sent several times to select the data transmission path. Upon a successful connection, the $rootScope.pc.onaddstream is getting activated (it's handler was described above) and the users can start a communication.
See also: How to build a chat app: Development Process Insights
In this article, I have described the step by step implementation of the video conference by means of webRTC technology. The examples are written on the basis of the code taken from the real project. However, I have removed all the business logic, the implementation of visualization, and the architecture of the client and server sides. This code represents the minimum functions set which should be written in order to create a successful conference. In actual practice, the implementation requires much more code. It is necessary to take into account a lot of details which are provided by the application logic used for building the conference.
Note that the main problem of implementation is NAT technology. To find a way around NAT, you can use external servers STUN and TURN. There is no need to configure the servers by your own. There are a lot of them that operate stably and are available in the clear.
If you have any questions feel free to contact us. We will be glad to provide all the possible help.

Evgeniy Altynpara is a CTO and member of the Forbes Councils’ community of tech professionals. He is an expert in software development and technological entrepreneurship and has 10+years of experience in digital transformation consulting in Healthcare, FinTech, Supply Chain and Logistics
Give us your impressions about this article
Give us your impressions about this article